Frameless Glass Shower Enclosure Design Tips
Upgrading to a new glass shower enclosure can be a painstaking process… but with a little bit of meticulous planning, your new frameless shower install will be seamless. The shower design process and pre-planning helps so that moisture is kept INSIDE the shower, leaks are avoided and mold does not form. Keep the following design tips in mind for success.
Design Tip #1: The Shower Head Position
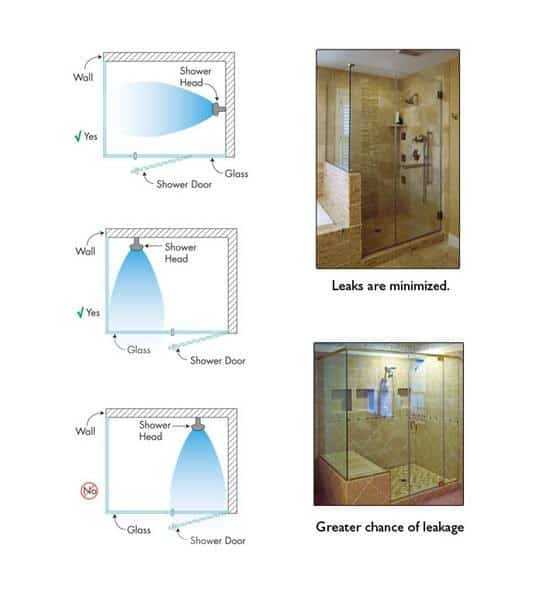
While it may be common sense, the position of one’s shower head is one of the most vital things to consider when designing your glass shower enclosure. To minimize leakage, you never want your shower head positioned facing the opening of the shower door. You want the shower head to be facing the tiled walls or fixed panels. This will help keep the water inside the shower enclosure, and not on your bathroom floor.
In these illustrations, the first two examples are ideal. Avoid what is shown in the third example.
Design Tip #2: Raised Tiles and Overhangs
When dealing with odd overhangs and raised tiles, one might wonder the best way to keep the water in one’s new shower.
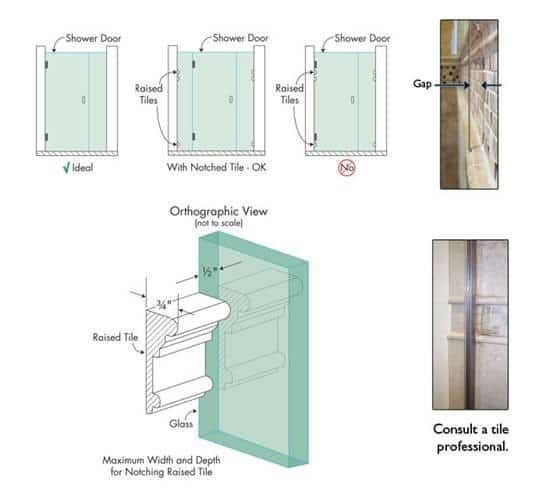
For one, to avoid gaps between the wall and the glass, use a fixed glass panel in your shower design and notch the tile so that the panel can be lined up flush against the wall. The maximum width and depth for notching raised tile is ¾” (depth) and ½” (width). To notch overhangs deeper than ¾” depth, you will need to consult a tile professional.
Keep in mind that the enclosure may in some instances still require the use of a metal filler (pictured on the right) between the glass and the buttress wall.
Another thing to consider – frameless glass shower enclosures are sealed with a clear silicone. You may be anxious to jump into your brand new shower, but the setting process takes 24 hours. This is to ensure the moisture stays locked in the shower area, and the frameless hardware is fully settled.
Design Tip #3: Curb Tops
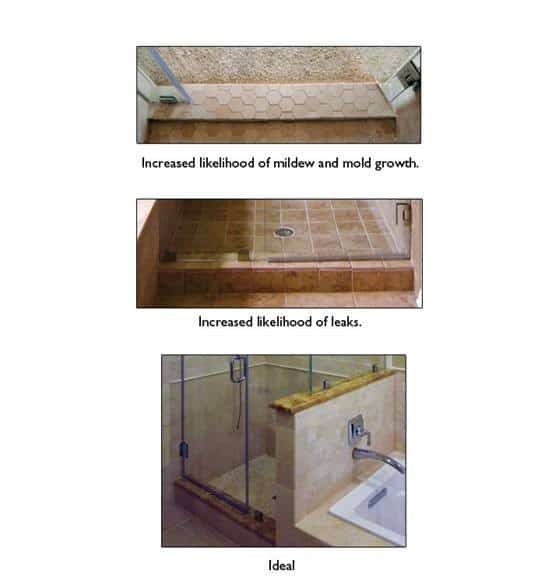
To decrease the likelihood of leaks in your shower enclosure, make sure that the curb top you use is a solid piece of tile, marble, or granite. Avoid a shower curb that is tiled with grout. Water collects in the grout joints and it may be an area where mildew can form. While it may be more expensive, having a solid piece of granite for the curb top (sans any grout lines) fixes this potential problem and will elongate the life of your custom shower enclosure.
See the third picture to see the ideal curb top for your glass shower enclosure.
Design Tip #4: Pipes and Wiring
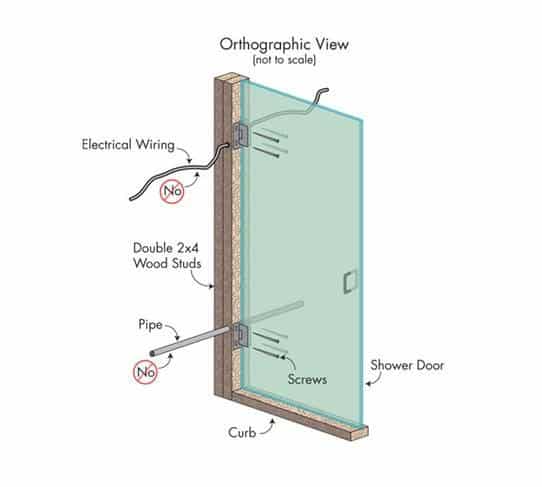
This tip is especially helpful if you’re installing a shower in a new section of your home, perhaps an unfinished basement or an expanded bathroom. Be wary of any plumbing pipe and electrical wiring where you will be anchoring your shower enclosure. Anchoring screws may puncture anything behind the studs or walls.
These design tips will ensure your shower enclosure avoids leakage and mold, and is easy to clean and maintain. Not to mention, being diligent in your shower enclosure design, ensures that the installers run into zero problems come installation day. One thing is for sure, you will be amazed how a frameless glass shower enclosure is sturdy, lacks ugly and bulky hardware, and keeps the water inside!
Here at ESP Supply, our knowledgeable design and installation team can help walk you through the process of designing your custom frameless shower door!
Request A Quote today for a Free Estimate!


